- Join us at our next "Learn to Run" event
Using Runkeeper to Set Intervals

Meet Jo
June 15, 2016
Learn to Run Graduates – Field Two, 2016
August 16, 2016
As a running coach, I mainly work with people who are at the very beginning of their running journey. Our most popular sessions are the ‘Learn to Run’ group that we hold weekly and which moves through a series of increasing run/decreasing walk intervals over a series of 12 weeks. To get the participants ready to move up each week I set running homework they must complete between sessions and as a result one of the most common questions I am asked is “Do you know a good app to use for setting intervals?”, soon followed by “Can you please show me how to use it?”. My answer to the first question is ‘Runkeeper’ and my answer to the second question is about to be explained in words and pictures below as it can be a bit tricky to follow.
How to set intervals on Runkeeper
 Step 1
- When you first open the Runkeeper app, swipe left on the blue section up the top until you get to the heading ‘Custom Workout’.
- Once on this page, click the white button ‘Change your workout’.
 Step 2
- On the next page enter a name for the workout in the box at the top. In the example I have called mine ‘Intervals’.
- Next hit the green ‘+’ symbol to ‘Add new action’.
 Step 3
- On this page select the speed you wish to run. I select ‘Steady’ for a jog/run interval and ‘Slow’ for a walk interval.
- Then choose whether your intervals are going to be ‘Time’ or ‘Distance’ based and set accordingly with the counters at the bottom.
- In my example you can see I have selected ‘Steady’, ‘Time’ and ‘2 minutes, 0 seconds’.
- After this you will need to hit the ‘Back’ button in the top left corner to finish the set up of the rest of your session.
 Step 4
- When you go back to the setting page you will see that there is now a ‘2 minute steady’ interval (or whatever interval you entered); this is the run step. Now you need to put in the walk step.
- Select the green ‘+’ button which says ‘Add new action’. This will take you back to the same page as in Step 3 above. Follow the same instructions to enter your walk interval, remembering to select the speed ‘Slow’. Then hit the back button.
 Step 5
- Now your workout will look like the example. At this point you can either keep repeating this process for all of the intervals you wish to add or if you want to repeat the same ones you can select the ‘Repeat’ button and then choose how many times you wish to repeat the same initial steps.
- You may also like to set a ‘Warm up’ and/or ‘Cool down’ using the options at the bottom of this page.
- Once you are happy with your workout, hit the ‘Save’ button up in the top right hand corner.
 Step 6
- Once you have saved the workout, hit the yellow button ‘Select this workout’.
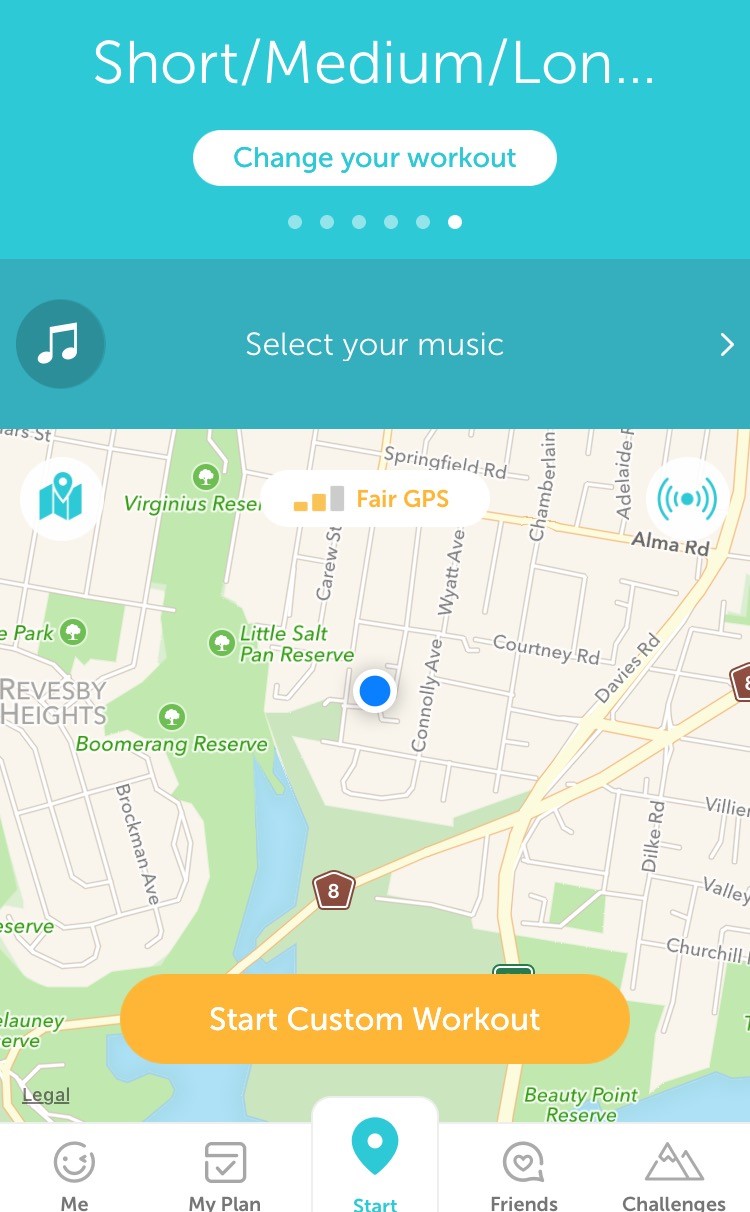
 Step 7
- Now you are ready to go. Just press the yellow button ‘Start Custom Workout’ and the Runkeeper voice will start talking to you. Make sure you have the volume turned up!
- You can also see in this picture ‘Select your music’, which you can do before you start. You will still be able to hear the Runkeeper voice telling you when to start and stop over the top of music.
- If you want to make another custom workout or change the intervals at a later date but not discard the ones you have just made you can do so by pressing the white button ‘Change your workout’. You can also edit saved workouts by pressing this button and scrolling downwards to the bottom of the page where they are stored in a list.
Happy running!

